Friday, September 3, 2010

Carpentry…Front porch (wrap-up)

Landon (Solid Construction) left late yesterday afternoon after finishing his work on the front porch at the “L” Shaped House. The front porch is probably going to be the “defining feature” of the house…especially for those who only see it as they drive by. Landon has done a particularly nice job putting together all the elements of both Mike Kloti’s original design and Paul Winter’s construction details. I took the photo here on my late night visit yesterday. In it we see many of the details of the screen porch including the railings, screens, and door hardware.

It is a very peaceful place at 10:00 pm…

deck 88

Carpeting…The basement family room

I stopped by the “L” Shaped House on my way home late last night and took a few photos of the basement family room after Rick Armstrong and his crew finished installing the new carpet tiles. The first shows a panoramic view of the family room from the far corner by the doors to the patio.

Carpet 32

The next photo shows a close up shot of the basement kitchen.

Carpet 34

Painting…Wrap-up

Pete and his crew of painters spent yesterday working to wrap up their work at the “L” Shaped House. They plan to be back this morning for just one more day of paint and varnish. The Photos below show a couple of the projects they are working to finish. First…the front stairs after Pete sanded, re-stained, and varnished the oak treads.

Painting 289

Second…Paul’s mudroom lockers after they applied the Pecan stain. Pete and his guys plan to get varnish on the lockers and the basement stairs as well as a third coat of white stain on the breezeway porches before they leave tonight.

And…just like that…they’ll be gone!

Cabinets 85

Thursday, September 2, 2010

Carpeting…Day 4

Rick Armstrong called me over to the “L” Shaped House at about 10 am to approve the pattern he plans to use as they lay the carpet tiles in the basement. We laid out a few of the patterns shown on the Shaw Carpet website but pretty quickly decided to use a method they have used in other carpet tile installations. We are using two tiles from the Shaw Carpet … Philadelphia Commercial collection (Ad-Lib and Unscripted) in the Hall Meeting color and have arranged them in a pattern that is both ordered and random at the same time. The first photo shows Rick and Jimmy working together as they got underway laying tiles.

Carpet 30

The next photo shows the new carpet tiles spilling across the basement floor from the patio doors in the North wall. We elected to have Rick start at the doorway so that any carpet replacement required at the doors would involve full tiles.

I think a good word to describe the new basement carpet might be…Bold!

The Screen Porch…

While working through the photos I took last night I ran across this photo taken inside the new screen porch. It was meant to be a just shot of the inside corner details on the porch but with the new White Pines and phase 2 plantings in the background it seems like a really good way show off the hard work of the landscape crew, the painters, and our carpentry guy…Landon.

Nice work guys!

deck 87

Wednesday, September 1, 2010

Painting…Day 70

Pete from Carmichael Decorating has been working his tail off all around the “L” Shaped House fixing all sorts of little dings, nicks, and dents in the painted surfaces. Today he tackled one of the last big jobs he’ll face at the house and re-finished the stairs between the first and second floors. They had seen a lot of abuse and were all scuffed up. By the time I showed up after work they looked better than new!

Thanks Pete.

Painting 288

Landscaping…Day 46

Luther stepped up today to lead Jay’s landscaping crew as they worked to place all the plantings in the phase 2 garden. The first photo shows Luther (kneeling) and one of his guys as he contemplates how to reconcile Matt Wolf’s master planting plan with the realities of the site.

Landscaping 286

The next photo shows the phase 2 planting bed from the Frank’s yard with most of the new plants laid out ready for planting. If you look closely at the left hand side of the photo you can see one of the landscaping guys consulting Matt’s master plan laying on the grass.

Landscaping 285

In addition to the planting going on in the front yard the landscaping crew is also working to fill in some of the areas that could not be planted earlier in the project. The photo below shows the small planting bed at the bottom of the side breezeway stairs.

Landscaping 287 

The last photo is a close-up shot of my new rock named Ann.

All 2900…fender crumpling…pounds of her!

Landscaping 290

Carpentry…Porches (day 12)

Landon worked today finishing the porch railing and installing screens in the screened-in section of the front porch. The first photo shows the front corner of the “L” Shaped House with all of the railings in place as Landon works to fit some of the trim on the porch framing.

deck 82

The next photo shows the finished railing installed all the way around the screen porch.

deck 84

The third photo Landon as he works to install the first sheet of aluminum screen material on the panel just outside the front door. The 48” wide screen material runs all the way from top to bottom as one continuous sheet on the flush face of the framing, and railing. In this system the spindles and railing are on the inside of the screen and the trim elements clamp the screen to the framing. The fourth photo shows the panel on the left side of the screen door after the screen and all of the trim have been installed.

deck 83 deck 85

The last photo (taken early this evening) shows the screened-in section of the front porch as Landon was packing up to leave for the day. The whole porch looks fantastic with the railings and screen in place.

deck 86

Landscaping…Low-Mow Turf

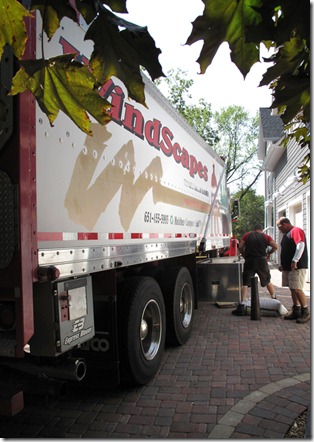
You know something big is up when you arrive to find this truck parked in front of your house. The folks from WindScapes arrived at the “L” Shaped House around noon today to install Low-Mow turf in both the front and back yards.

Low Mow 2

The first part of the process is aerating the soil using a piece of equipment from First Products called an AERA-vator. The solid tines of the AERA-vator vibrate as they pierce the soil leaving behind a nice loose surface for the blown-in Low-Mow product.

Low Mow 1

A short video of the AERA-vator in action in the back yard at the “L” Shaped House.

The next step involves the giant truck full of dirt and grass seed. The truck has a auger feed hopper that delivers the dirt and seed mixture to a hose where it is blasted out the end with compressed air. The photos below show one of the two trucks parked along the front of the garage as they deliver dirt to the back yard.
Low Mow 3

The video here shows the truck and blowing equipment in action on the garage apron.

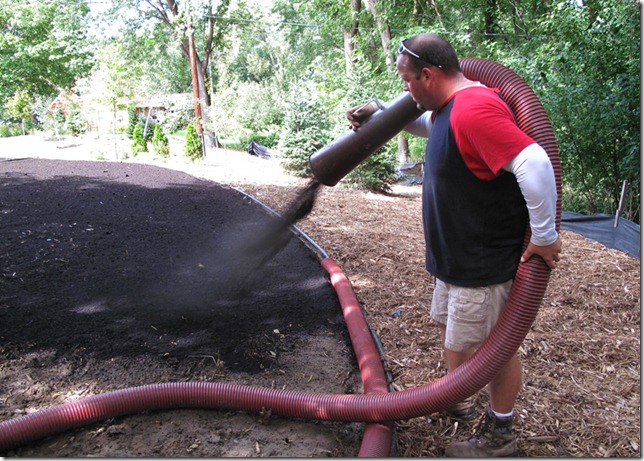
The fifth photo shows one of the WindScapes guys wielding the “business end” of the hose delivering the Low-Mow product to the area behind the garage.
Low Mow 7

The video here is an extended look at the process as the soil and seed mixture is delivered to the yard.

The last photo shows the progress they had made in just a little over an hour on the site. The dirt and seed mixture is blown-in up against the plastic edging to a depth of about 3”.

They can cover a lot of ground pretty quickly!

Low Mow 5

Landscaping…The Dog Run

After Jay’s JLM Landscaping crew finished up their part of our high-tech dog run Paul went to work installing the pet door and building a ramp to the porch. The photos below shows all of the elements of the backyard dog run together for the very first time. In the first we see the K9 grass inside the fencing and the ramp leading to the porch (we’ll remove a couple of spindles later).

Dog Door 4

The second photo shows the dog run, ramp, and pet door off the back side of the breezeway porch. We plan to have a “flexible” barrier that will clip in-between the porch railing and back wall of the house to restrict access to part (or all) of the rear breezeway porch.

I think this entire system is going to be really nice for both the dogs and humans.

Dog Door 5