Showing posts with label Carpentry. Show all posts

Friday, September 24, 2010

Carpentry…Breezeway porch fix

The Solid Construction folks came back early this morning to fix a stair tread consistency issue the building  inspector found during his visit the other day. The first step off the pavers fell just outside the 3/8” height variation required by the code. The Solid guys decided to carefully disassemble the treads and risers to allow access as they trimmed the tops of the stringers under the treads. The first photo shows the Solid guy working to reassemble a stair tread after trimming the stringer.

deck 92

The second photo shows the breezeway stairs after with the “fix” applied. The tread adjustments are just barely visible along the left hand side of the stairs. Once we get the painters back to put another coat of white stain on the cedar no one will ever know the stairs were adjusted!

deck 93

Monday, September 13, 2010

Garage…Stairs

Paul Winters finished the carpentry work on the stairs leading to the mudroom from the garage early this afternoon. We plan to eventually replace these stairs with fabricated steel stairway that includes an integrated wheel chair lift. For the first couple of years I’m sure these will serve us well.

Garage 31

Saturday, September 11, 2010

Garage…New stairs

And just like that…Paul has the new steps to the mudroom in place. Anna and I found Paul working Saturday morning re-building the steps in the garage. He decided to pretty much start over rather than re-work the temporary ones the framing guys threw together last fall. In his typical fashion he has the variations in both rise and run well under 1/8”.

Next up…the railings.

Garage 30

The Garage…Loose ends

Paul Winters has spent the last few days working to finish a couple loose ends in the garage at the “L” Shaped House before our final…final…inspection. The first photo below shows the steel I-beam post between the third and fourth stalls in the garage after he finished wrapping it in sheetrock to satisfy the fire code.

Garage 28

The second photo shows the temporary stairs leading to the mudroom from the garage as Paul works to re-configure them to meet the building code requirements. We plan to add a wheel chair lift to the left hand side of the the staircase which might eventually involve replacing the entire stair case assembly. In the mean time we plan to make a set of ramps that will attach to the stairs when we need to provide easy access into the “L” Shaped House.

Garage 29

Friday, September 3, 2010

Carpentry…Three porches (wrap-up)

During a noon visit today I took a few photos of the front porch and rear breezeway porch at the “L” Shaped House. The first photo shows how Landon’s very nice work on the inside of the front porch carries through to the outside as well. I find this view of our new home particularly pleasing.


deck 89

The next photo shows the front of the house from middle of the driveway with the side breezeway deck and barn lights along the front of the garage visible on the extreme right. The uniform railing and column details on the three porches tie these elements together nicely and really complete the farm house look.

deck 91

The last photo shows most of the back side of the house with the rear breezeway entrance visible in the center. With the porches complete we can now see Mike Kloti’s vision for the house in the flesh. Everything from the MiraTEC trim wrapping the structure…to the railing defining the porches…to the Kloti Chops at the eaves…has come together with a sense of scale and proportion that seems nearly perfect!

deck 90

Carpentry…Front porch (wrap-up)

Landon (Solid Construction) left late yesterday afternoon after finishing his work on the front porch at the “L” Shaped House. The front porch is probably going to be the “defining feature” of the house…especially for those who only see it as they drive by. Landon has done a particularly nice job putting together all the elements of both Mike Kloti’s original design and Paul Winter’s construction details. I took the photo here on my late night visit yesterday. In it we see many of the details of the screen porch including the railings, screens, and door hardware.

It is a very peaceful place at 10:00 pm…

deck 88

Thursday, September 2, 2010

The Screen Porch…

While working through the photos I took last night I ran across this photo taken inside the new screen porch. It was meant to be a just shot of the inside corner details on the porch but with the new White Pines and phase 2 plantings in the background it seems like a really good way show off the hard work of the landscape crew, the painters, and our carpentry guy…Landon.

Nice work guys!

deck 87

Wednesday, September 1, 2010

Carpentry…Porches (day 12)

Landon worked today finishing the porch railing and installing screens in the screened-in section of the front porch. The first photo shows the front corner of the “L” Shaped House with all of the railings in place as Landon works to fit some of the trim on the porch framing.

deck 82

The next photo shows the finished railing installed all the way around the screen porch.

deck 84

The third photo Landon as he works to install the first sheet of aluminum screen material on the panel just outside the front door. The 48” wide screen material runs all the way from top to bottom as one continuous sheet on the flush face of the framing, and railing. In this system the spindles and railing are on the inside of the screen and the trim elements clamp the screen to the framing. The fourth photo shows the panel on the left side of the screen door after the screen and all of the trim have been installed.

deck 83 deck 85

The last photo (taken early this evening) shows the screened-in section of the front porch as Landon was packing up to leave for the day. The whole porch looks fantastic with the railings and screen in place.

deck 86

Tuesday, August 31, 2010

Carpentry…Porches (day 11 evening report)

Landon worked his way across most of the front porch assembling railings this afternoon. The photo here shows the front of the “L” Shaped House at about 6 pm this evening with Landon hard at work on the last stair railing. He plans to have a helper tomorrow morning as he moves into the screen porch.

It all looks fantastic!

deck 80

Carpentry…Porches (day 11)

Landon is back today working on railings for all three porches at the “L” Shaped House. The first photo shows the back breezeway porch after he finished installing all of the balusters in the the railings. Once the painters finish putting the second coat on everything this porch will be done!

deck 78

The next photo shows the side breezeway porch with all of the elements of the railing system in place. Landon was heading off to start on the front porch as I left around 1 pm and expects to be moving on to the screen for the screen porch sometime tomorrow.

deck 79

Carpentry…The Dog Door (day 2)

Paul continues his work on the dog door in the outside wall of the mudroom. The first photo shows the the “inside” half of the dog door standing next to the opening Paul has created in the wall. We are using the double flap version of an Endura Flap pet door from Patio Pacific that includes a magnetic “closer” and a sturdy locking cover on the inside flap.

Dog Door 1

The next photo shows Paul holding the door assembly in place in the wall. The last photo shows the MiraTEC trim and DuPont window flashing Paul is using as he finishes the rough door opening on the outside wall.

Dog Door 3 Dog Door 2

Monday, August 30, 2010

Carpentry…The dog door

I snuck out the back breezeway door and finally got a photo our camera shy construction supervisor…Paul Winters…as he worked to cut his way through the James Hardie siding on the porch where the dog door will be installed (he couldn't hear a thing with the grinder running) .

Landscaping 272

The next photo shows the nice clean hole he cut in the siding where he plans to install a MiraTEC frame surrounding the dog door. The last photo shows the doggie ramp extending into the dog run from the breezeway porch. The plan is to train the dogs to run out through the door, and down the ramp into the dog run to “do their jobs” on the K9 grass.

Landscaping 271 Landscaping 270

Carpentry…Porches (day 10)

Landon (Solid Construction) is back today starting work on the porch railings. The first photo shows two deck rails for the stair section of the side breezeway porch with stair baluster connectors attached. The stair sections are presumably a lot tougher to lay out and assemble than the straight runs across the porches.

deck 76

The next photo shows the first section of balusters installed on the front side of the stairs leading to the breezeway entrance to the “L” Shaped House. This system of aluminum balusters and connectors creates a nice clean looking railing.

deck 77

Sunday, August 29, 2010

Last weekend in August…part 2

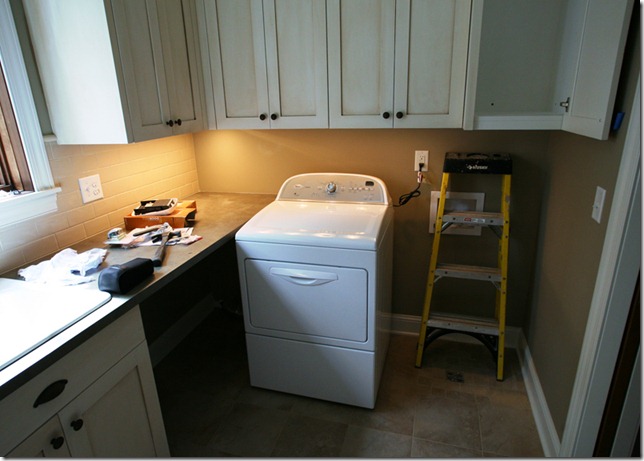
Continuing the theme from last night’s posting…the photos here show more of the results of last week’s flurry of activity at the “L” Shaped House. The first photo shows the dryer in the first floor laundry room after Paul finished hooking up the newly routed venting that allows a closer fit to the back wall.
Appliances 38

The next photo shows the tall upper cabinet above the washing machine in the first floor laundry room after Paul cut a hole through the ceiling to connect to the laundry chute above. The third photo shows the basement microwave cabinet after Luke (Wire-Rite) finished installing the electrical outlet in the cabinet above and routing the power cord to the microwave.

Cabinets 84 Appliances 37

the fourth photo shows the stacked washer and dryer in the second floor laundry room with nearly every detail completed including paint touch-ups, window hardware, and plumbing hook-ups.

Appliances 39

The fifth photo shows the first floor bathroom after Luke (Wire-Rite) finished wiring the light fixture…Pete (Carmichael Decorating) repainted the wall…and Paul mounted the mirror Deb selected. Paul and Nate also removed, re-scribed, and re-mounted the cultured marble vanity top to get a better fit along the back wall.

Electrical 104(2)

The sixth photo shows the lockers Paul is building in the mudroom. He has all of the maple trim attached and is just about ready to start sanding and filling. The 18” high upper cubbies and 8” deep hanging wire baskets underneath the lockers should give us plenty of storage for our day-to-day clothing accessories.

Cabinets 83

The seventh photo shows the French doors and side lights leading to the screen porch from the living room after Paul removed the plastic film protecting the glass. The view through this “wall of glass” at the front of the living room is fantastic and it feels like the amount of light streaming in has increased ten times.

Doors 30

The eighth photo shows the master bathroom after Pete (Carmichael Decorating) finished touching up all of the little “imperfections” he could find (there are still a couple pieces of masking tape on the wall). He has worked the last few days touching up “here and there” throughout the “L” Shaped House.

Painting 285

The ninth photo shows the collection of paint in the basement storage room Pete has to sort through as he works his way around the house touching up walls, trim, and ceilings. It kind of makes you wonder what we are going to do with all these cans of paint after they leave…

Painting 286

The last photo shows the mechanical room in the basement with…I’m pretty sure…all of of our plumbing and mechanical systems in place. Jeremy (Steinkraus Plumbing) finished up all of the “loose ends” on the plumbing system including the drain for the water softener early in the week and Gordie Buhrer showed up Friday to plug it in and set up a program for softening.

basement 9

Thursday, August 26, 2010

Carpentry…Doors (from the inside)

I took this extreme panoramic photo from the landing on the front stairs to try to capture both sets of exterior doors and the fireplace in one wide image. The photo provides a fairly good sense of the “open” feeling in the space and shows off the additional light let into the room nicely. Paul Winters took advantage of the incredibly nice weather today and has all the windows and doors open.

The whole house felt wonderful!

Doors 29

Carpentry…Porches (day 10)

Landon and his Solid Construction crew are back today working on the side breezeway porch. The first photo shows Landon as he installs the last few screws holding the “code Rail” on the right hand stair railing. This set of stairs is pretty much the last major item they will build before moving on to the spindles in the railings and the screen for the screen porch.

deck 73

The next photo shows the sample section of railing Paul Winters put together to help us as we selected a spindle color. After looking at this assembly in a few positions around the front porch we chose the white ones!

deck 74

Wednesday, August 25, 2010

Carpentry…The front door

Today was a special day…Landon (Solid Construction)  installed the front door on the “L” Shaped House. The first photo shows the solid Simpson door and side lights shortly after Landon finished installing the door handle and deadbolt. The mahogany stain looks really nice and it feels great to finally have a proper front door.

Doors 25

The next photo shows the front door standing open into the foyer. The third photo shows Landon as he worked installing the strike plate on the door jam.

Doors 24 Doors 27

The last photo shows the new front door and side lights from a spot in front of the island in the kitchen. In it we see the cherry stain we selected for the inside surfaces of all the exterior doors as well as the Poplar door leading into the coat closet off the foyer. The windows in the door and side lights let a lot of light in and really brighten up the front entry of the house.

Doors 28

Carpentry…Porches (day 9)

Landon and his Solid Construction crew are hard at work installing the finish trim on the front porch. The photo below shows Landon working on one of the column bases on the East end of the house. If you look closely you can see the bases and caps on the columns all across the rest of the porch. This photo also shows most of the elements of the screen porch and railing painted white for the first time. Steve Carmichael and his crew have primed almost all of the wood on the porches and will double back with the finish stain shortly.

Wow…I think it looks great!

deck 65

Appliances…The upstairs laundry

This posting could (should?) be titled “So…you want to be a builder”

I’m wandering around the “L” Shaped House after work last night catching up on what’s going on and see the washer and dryer stacked together nearly ready to be pushed back into the cabinetry. It strikes me that the 12” of clearance above the dryer might be better used lifting the washer higher off the floor. I know Paul will be back later so I “ambushed” him at about 7:30 pm with my new request. We talked about the possibilities and came up with a plan to build a platform 10” off the floor for the washer/dryer assembly.

Appliances 31 Appliances 32

Because the crew from American Air Supply is coming first thing in the morning to install the dryer venting in the outside wall Paul has to get busy building the platform right away. The photo below shows the scene at about 8:30 pm just before I drove off to get Sam at karate and head home.

It seems an appropriate photo for Paul’s first appearance in this blog!

Garage lights 5

Tuesday, August 24, 2010

Carpentry…The mudroom lockers (day 2)

Paul continues to work on the lockers in the mudroom (in-between all his other duties). The photo here shows the lockers after he finished attaching the cabinetry to the outside wall and started assembling maple trim on the fronts. I think building them with an open back (allowing the wall paint to show through) was a really good idea. We have decided to have Steve Carmichael finish them with a light stain and varnish.

Cabinets 81